![]() Cross-platform transfer solution for all smartphone users to transfer content between Android and iOS, transfer data from iTunes, iCloud, iTunes library to mobile phone.
Cross-platform transfer solution for all smartphone users to transfer content between Android and iOS, transfer data from iTunes, iCloud, iTunes library to mobile phone.
![]() > How-To > How to Recover Lost Data on iPad from iCloud
> How-To > How to Recover Lost Data on iPad from iCloud
How to Recover Deleted or Lost Data on iPad from iCloud
Have you ever accidentally deleted/lost pictures, text messages, contacts and other important data on your iPad? Or after a factory reset, all data are gone. Upgrade to new version may also cause the lost of data for your iPad. The iOS black/white screen or crash cause you loss of all of your data, too. So how to recover your lost data from iPad?
Actually, all your lost files are still on you iOS device, iTunes(if you have backup), iCloud(if you have uploaded). You can recover them with an iOS data recovery software. Here we provide you powerful iOS Data Recovery to solve the problems.
PanFone iOS Data Recovery is a best iPhone data recovery software which can retrieve lost or deleted data including contact, whatsapp, message, photos, pictures, videos for iPad Pro, iPad/iPad2, iPad Mini/iPad Mini2/iPad Mini3/iPad Mini4, New iPad, iPad Air/iPad Air 2.
PanFone iOS Data Recovery provides 3 modes for recovery. The data can be "Recover from iOS Device", "Recover from iTunes Backup File" and "Recover from iCloud Backup File". In this article, we will introduce how to recover data from iCloud Backup File.
At first, we need to download the PanFone iOS Data Recovery by clicking following button:
Download
Win Version Download
Mac Version
Supported devices and data can be recovered
| Supported devices | Data available to recover | ||||||||||||||||||||||||
|
Recover Deleted/lost Data on iPad from iCloud Backup File
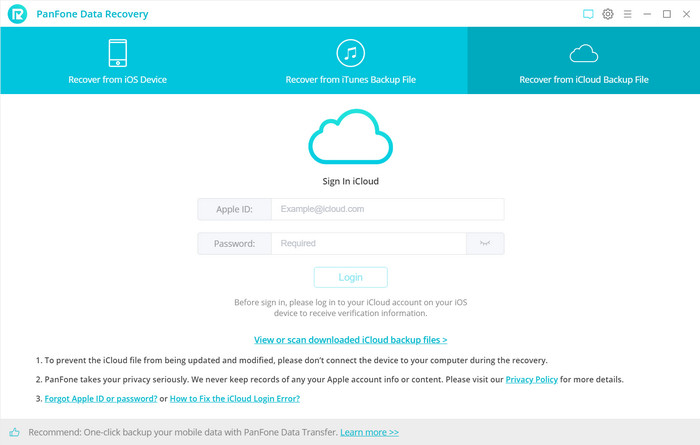
Step 1: Launch the program and login iCloud.
Select "Recover from iCloud Backup File" mode and enter your iCloud account to sign in. When you do this, make sure that your Internet connection is in good condition.
Note: Please do not connect the device to your computer during the recovery to prevent the iCloud file from being updated or modified.
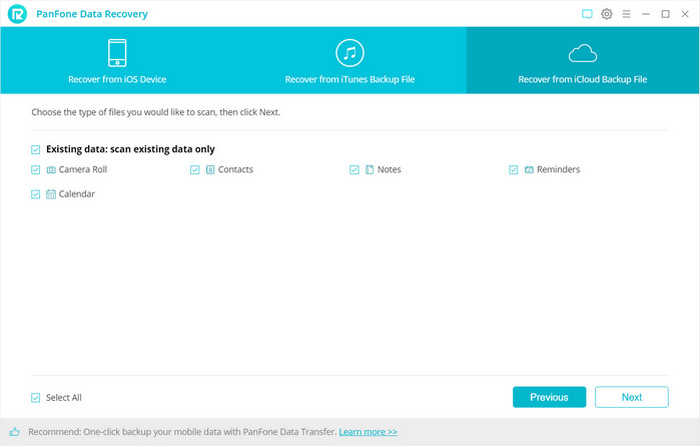
Step 2: Download latest iCloud backup file
All iCloud backup files will be loaded and listed. If you have synced different iDevices with iCloud before, more than one backup files will show up after you sign in iCloud. Choose the one you want to access and choose a backup to download. Then click on Next. Simply tick the ones you need, this would save you much time if you just would like to download parts of the files.
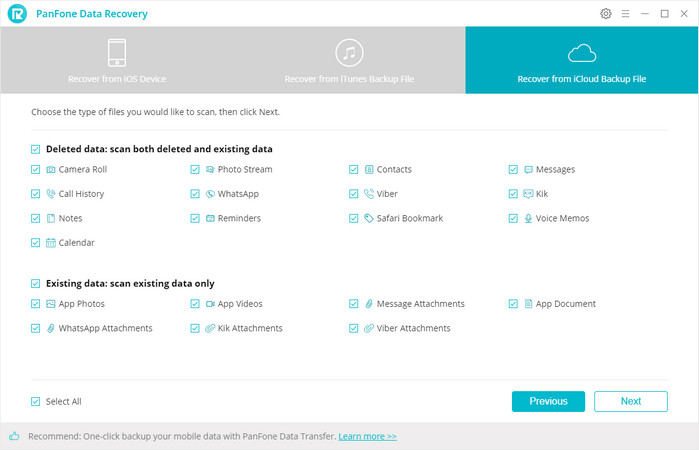
Step 3: Extract the downloaded iCloud backup to access the content.
Once the downloading is completed successfully, you can begin scanning to extract it so that you can access the details. All the contents from the iCloud backup file including contacts, notes, calendar, Camera Roll will be displayed in detail. Then you just need to select bookmarks you’d like to recover. Click Next after the download process. The program can extract the backup file quickly.
Step 4: Preview to Ensure What You Want to Recover.
This step is to take a glance at your content thumbnails in your iCloud backup file. Choose what to retrieve and save them to computer by click Recovery button at the bottom of the program pane. You will be prompted to choose "Recover to Computer" or "Recover to Device". So you can easily save all of them to your computer or directory put them back to device. In addition, you can delete the iCloud backup files downloaded after recovery.
So after only 4 steps, you will get all lost data back on your iPad. With the help of PanFone iOS Data Recovery, to find back the data becomes easy and convenience.
Download
Win Version Download
Mac Version