![]() Cross-platform transfer solution for all smartphone users to transfer content between Android and iOS, transfer data from iTunes, iCloud, iTunes library to mobile phone.
Cross-platform transfer solution for all smartphone users to transfer content between Android and iOS, transfer data from iTunes, iCloud, iTunes library to mobile phone.
![]() > How-To >How to Recover Lost or Deleted Viber Messages on iPhone
> How-To >How to Recover Lost or Deleted Viber Messages on iPhone
How to Recover Lost or Deleted Viber Messages on iPhone
Are you looking for any way to recover Viber messages on iPhone? If you accidentally deleted it from your iPhone or the iPhone is lost/broken, how to find them? The worst, you even have not made any backup of it, any ideas to retrieve the Viber messages? If you are bothered by these questions, the article will help you to solve them.
Viber is one of the most trusted and secure instant messaging apps available in recent years. For iPhone users who use Viber a lot, the Viber data may include lots of important information. Losing Viber messages can happen to anyone – whether you deleted messages that you thought you would no longer need, you accidentally deleted messages or a failed OS upgrade caused data loss, the stress of losing important data is the same. If you have lost Viber messages that you need to get back, you can do so using one of our 3 methods below. If you do not have an iTunes or iCloud backup, do not worry, by following the first method, you can recover the lost Viber message from iPhone directly without backup!
 Method 1: Recover Viber from iPhone directly without backup
When the data loss on iPhone happens suddenly, you might be worried that you will not be able to recover your deleted Viber messages without an iTunes, Finder or iCloud backup. But even without any backup, Viber messages and attachments can be retrieved from the iPhone directly. An excellent iPhone data recovery tool can help you to realize it, just like PanFone iOS Data Recovery. It is one of the reliable and most trusted iOS data recovery tools that allows you to recover permanently deleted data from your iDevice, iTunes backup and iCloud backup and it supports:
- 3 recovery modes to retrieve data from your iDevice, iTunes backup and iCloud backup.
- Recovering photos, messages, contacts, as well as Viber data.
- Previewing what you've found before performing recovery.
- You can choose to extract the scanned data to a PC or put them back to the device.
Steps to retrieve Viber on iPhone without backup
Step 1 Download and install the PanFone iOS Data Recovery.
Click the following button to download the proper version and install the program on your computer.
Download
Win Version
Download
Mac Version
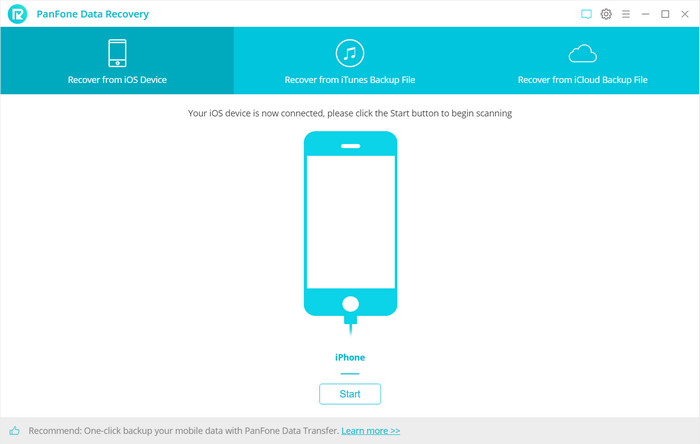
Step 2 Run the program and connect iPhone to the computer.
Start PanFone Data Recovery on your computer. Connect your iPhone to the computer via USB cable and keep your iPhone unlocked. When you see the prompt message on the iPhone, choose "Trust this computer" on iPhone SE. The program will detect your iPhone and display it on the main interface. Now, you will see the window like below:
Note: If your phone cannot be detected by the computer, please go to this tutorial to check the Apple Mobile Device USB Driver.
Step 3 Scan your iPhone.
After the iPhone is recognized, you will see 3 recovery modes: Recover from iOS Device, Recover from iTunes Backup File, Recover from iCloud Backup File. Simply select the "Recover from iOS Device" mode and click the Start button. Then the program will begin analyzing and scanning all the data on your iPhone. Wait with patience, it may take a while to analyze your data.
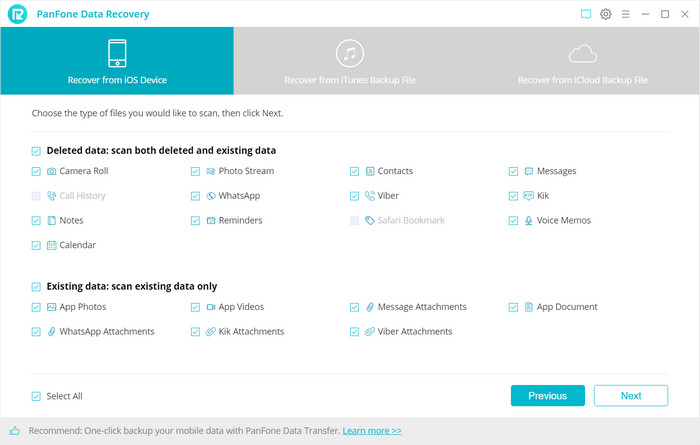
Once the scan process is finished, you can preview all found data. Just choose the data you need to load. If you only need to recover Viber, just tick the checkbox of Viber and Viber Attachments on the panel.
Then click on Next to start loading the deleted Viber messages and existing Viber messages from iPhone. The deleted messages can be recovered if it can be scanned.
Step 4 Preview and recover the deleted contacts from your iPhone.
After PanFone Data Recovery finishes, all found data would be listed on the right of the panel and you can preview all data in detail.
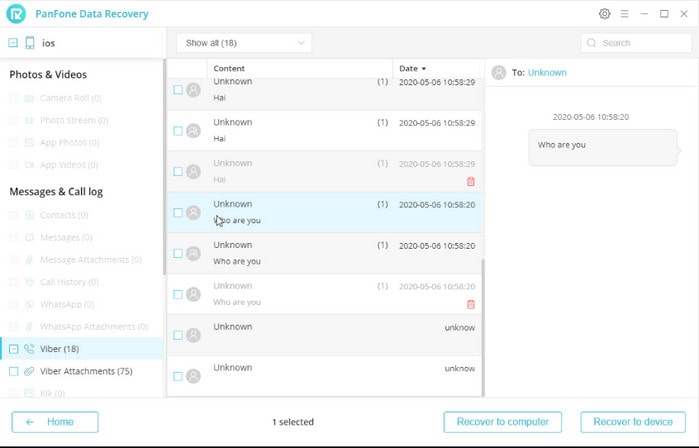
Navigate to Viber or Viber attachment folder, check details and choose contents you want to recover. The deleted messages are signed with recycle bins in red color. Then click Recover to Computer. When recovering, please do not disconnect your phone until the program prompts you the recovery is finished.
Tips: You can choose to display the deleted data only by choose "Show only deleted files" from the drop-down list.
Method 2: Restore Viber from iCloud backup
If you have previously made a full backup of your iPhone with iCloud, then you can easily restore Viber data, and even retrieve deleted Viber messages from a backup. There’s one major drawback – you won’t be able to select just Viber. All the data from your old iPhone will be restored to a new one. This process will overwrite all the current data on your iPhone, so you will lose any files that have been created or settings that have been changed since your last backup. The steps are as following:
Restore your device from an iCloud backup
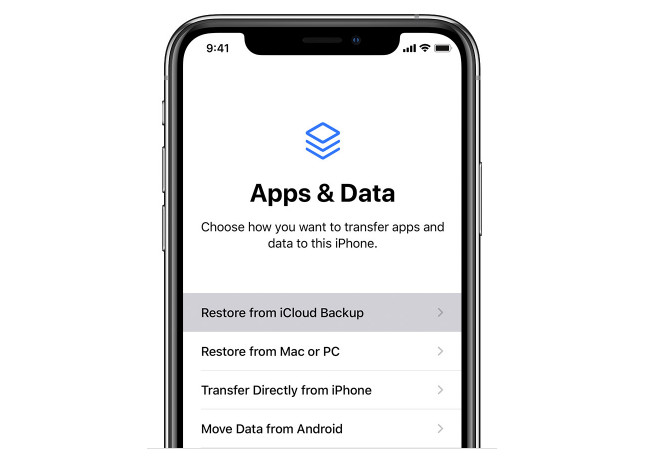
- Turn on your device. You should see a Hello screen. If you already set up your device, you need to erase all of its content before you can use these steps to restore from your backup.
- Follow the onscreen setup steps until you reach the Apps & Data screen, then tap Restore from iCloud Backup.
- Sign in to iCloud with your Apple ID.
- Choose a backup. Look at the date and size of each and pick the most relevant. After you choose, the transfer starts. If a message says that a newer version of the software is required, follow the onscreen steps to update (If you don't see onscreen steps to help you update, learn what to do).
- When asked, sign in with your Apple ID to restore your apps and purchases (If you've purchased iTunes or App Store content using multiple Apple IDs, you'll be asked to sign in to each). If you can’t remember your password, you can tap Skip this Step and sign in later. But you won't be able to use the apps until you sign in with your Apple ID.
- Stay connected and wait for a progress bar to appear and complete. Depending on the size of the backup and the network speed, the progress bar might need a few minutes to an hour to complete. If you disconnect from Wi-Fi too soon, the progress will pause until you reconnect with Wi-Fi.
- Now you can finish setup and enjoy your device. Content like your apps, photos, music, and other information will continue to restore in the background for the next several hours or days, depending on the amount of information there is. Try to connect often to Wi-Fi and power to let the process complete.
Method 3: Recover Viber from iTunes backup without replacing data
It is a normal way to restore iTunes/iCloud backup onto your iPhone to get back the lost Viber messages. It has been used by lots of iPhone users. But at the same time, you may find that if you restore via the iTunes/iCloud backup, all the existing data on your iPhone will be replaced by the data in the backup. It is a very frustrating thing. By using PanFone iOS Data Recovery, it can help you gain access to an iTunes or iCloud backup and extract the missing Viber messages. Here’s how to do it.
Detailed steps of restoring Viber Data to iPhone from iTunes backup
Step 1 : Download and install the PanFone iOS Data Recovery.
Click the following button to download the proper version and install the program on your computer.
Download
Win Version
Download
Mac Version
Step 2 : Run the program and connect iPhone to the computer.
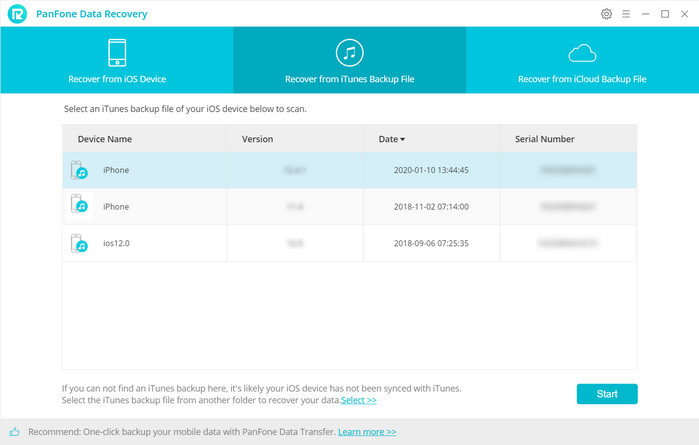
Step 3 : Select the Recover from iTunes Backup File mode on the main interface.
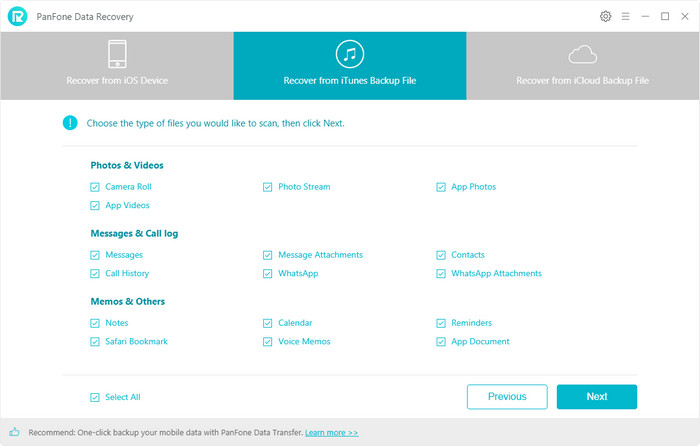
Choose the one from the list, and then start loading the backup file.
Step 4: Recover Viber from the iTunes backup file.
You can find all the found data are displayed in different types. Just choose the Viber data you prefer to recover and then press the Recover button and you can recover them to your computer.
Conclusion:
To solve iPhone Viber user’s data loss problem, this article offers three methods on how to recover Viber messages on iPhone as described above, no matter you have a backup or not. Now you can follow one of them to recover the lost or deleted Viber messages on iPhone. You can easily restore deleted messages in Viber through cloud backup such as iTunes. And through PanFone Data Recovery, you can get the message back without replacing your current one. Also you can try it to retrieve the deleted messages in Viber without backup.
Key Features of PanFone Data Recovery
PanFone Data Recovery is one of the reliable and most trusted iOS data recovery tools that allows you to recover permanently deleted data from your iDevice, iTunes backup and iCloud backup and it provides 3 recovery modes to retrieve data:
- Can restore videos, photos, contacts, music, call history, text messages, WhatsApp conversations, iPhoto, Instagram, etc. on your iOS Device.
- 3 Recovery modes - Recover from iOS Device, iTunes Backup and iCloud Backup without overwriting.
- A detailed preview before performing recovery.
- You can choose to extract found data to the computer or put them back to the device.

Questions about PanFone Data Recovery:
- Is PanFone Data Recovery safe to use?
Yes. PanFone Data Recovery is completely safe to use and will not cause any damage to your device or your computer. The software will scan the hidden file in your device and recover them or recover the file by downloading the backup file and try to recover. - How long will it take to recover the Viber messages?
The time it will cost depending on how much data you have available on your device. And PanFone tries to retrieve data as quickly as within minutes. If you just need to recover deleted Viber messages, we advise that you only select this data type before you start the recovery scan – this will speed up the recovery time considerably. - What format can I save my Viber messages in after I export them?
The export format of Viber messages can be in CSV or Excel format.
If you need any more help during using the Enigma Recovery software, please visit our FAQs or contact our Support Team via email.
Video Guide