![]() Cross-platform transfer solution for all smartphone users to transfer content between Android and iOS, transfer data from iTunes, iCloud, iTunes library to mobile phone.
Cross-platform transfer solution for all smartphone users to transfer content between Android and iOS, transfer data from iTunes, iCloud, iTunes library to mobile phone.
![]() > How-To > How to Backup iPhone Voicemails to PC
> How-To > How to Backup iPhone Voicemails to PC
How to Backup iPhone Voicemails to PC
Have you ever encountered the situation when you cannot find a voicemail that contains important information you need? Or have you ever found it difficult to find the very voicemail you need among lots of them? If you have had such experience, it is not too late to start backing up your voicemails on iPhone! There are two ways to back up your iPhone voicemails, and they will be explained below.
 Solution 1. Using iTunes to Backup iPhone Voicemails to PC
One of the first options that come into your mind is to use iTunes to back up the voicemails' data on your iPhone. iTunes is the default supporting software for iPhone, iPod, and iPad. It provides customers with general features such as data backup and restoration.
Step 1 : Connect your iPhone to your PC and open iTunes.
Step 2 : Back up all data on your phone, and your voicemail files should be contained within it.
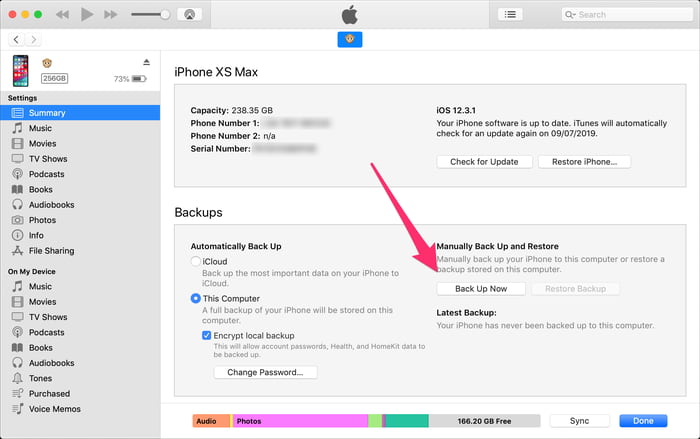
iTunes, as the default application for iPhone backup, has not been very welcomed by iPhone customers due to its backup inflexibility and operation complexity. If you only need your voicemails to be backed up, iTunes is not your first choice because it will take a long time to finish backing up the whole phone. Now, there’s a better option for you to consider.
Solution 2. Using PanFone Data Transfer to Backup Voicemails on iPhone
PanFone Data Transfer not only offers features that help its customers to transfer data, but also supports data restore and backup. It can back up over 10 types of data including voicemails. More importantly, if the customers wish to back up their phones, they can simply click a few buttons to achieve it. Moreover, they are able to choose types of data they wish to back up; no need to worry about backing up the whole phone every time.
Step 1 : Download and install PanFone Data Transfer on your computer. Connect your phone to your computer.
Download
Win Version
Download
Mac Version
Step 2: After connecting your phone, you will be shown three options on the left side of the default menu. Select Backup and enter the backup menu.
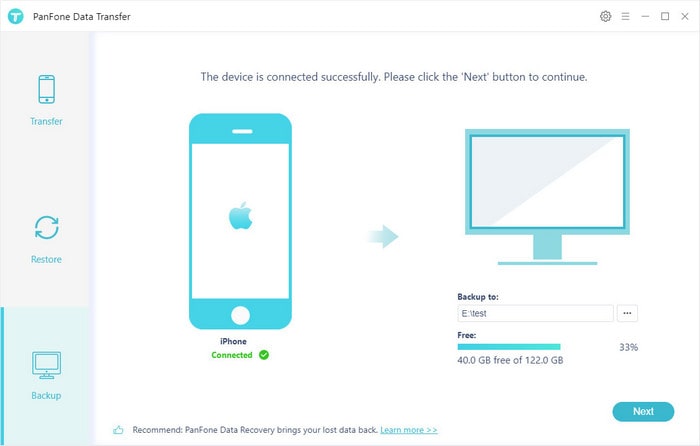
Step 3: Select your backup location on your PC by pressing [...] button, and click Next.
Step 4: Only select voicemail data to backup, and click Next (you can also choose any other types of data to back up as you wish).
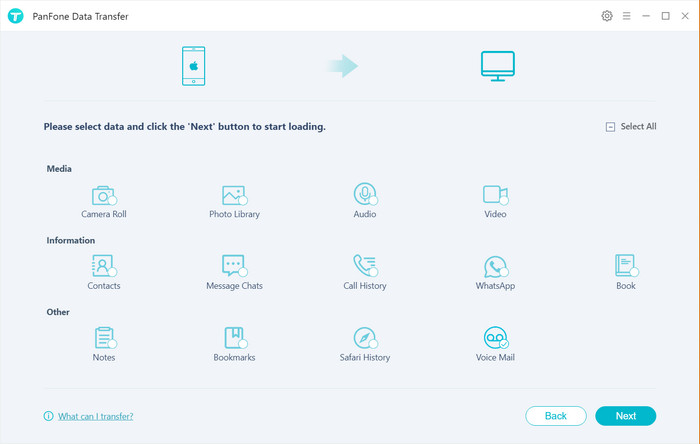
Step 5: Please wait patiently as PanFone Data Transfer loads your voicemail files. This process may take a few minutes to finish.
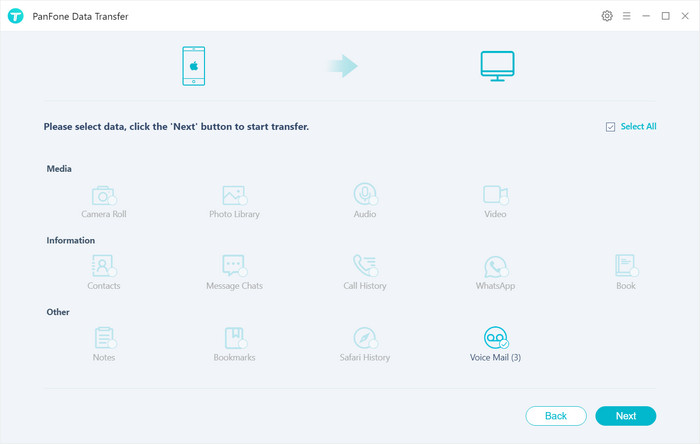
Step 6: Click Next when it finishes loading to start exporting iPhone voicemails to your PC. Keep it in mind that your phone needs to be connected to your PC during the loading and backup process.
Above explains two ways to back up iPhone voicemail to PC. Using iTunes doesn’t require the download of a third-party application, however, its shortcoming is obvious. iTunes backs up the whole phone even though you only wish to back up a part of it, and this backup process takes longer and longer as your phone data grows in size. On the other hand, PanFone Data Transfer, as a third-party application, can resolve this problem easily by selecting wanted data before-head. Its efficiency and simplicity can definitely save you a lot of time.
Download
Win Version
Download
Mac Version