![]() Cross-platform transfer solution for all smartphone users to transfer content between Android and iOS, transfer data from iTunes, iCloud, iTunes library to mobile phone.
Cross-platform transfer solution for all smartphone users to transfer content between Android and iOS, transfer data from iTunes, iCloud, iTunes library to mobile phone.
![]() > How-To >Is Wi-Fi not working on your iPhone? Here’s The Fix!
> How-To >Is Wi-Fi not working on your iPhone? Here’s The Fix!
Is Wi-Fi Not Working on Your iPhone? Here’s The Fix!
Are you encountering Wi-Fi not working issues on your iPhone? Do you find your iPhone keeps dropping Wi-Fi? This is a common problem reported by Apple users, especially if you have just updated your iOS software.
But don’t worry. In this guide, we will provide you some simple and effective solutions on how to fix Wi-Fi not working problems on your iPhone. The issues include iPhone not being able to connect to a Wi-Fi network, Wi-Fi connection keeps dropping out intermittently, Wi-Fi settings grayed out or Wi-Fi speed is extremely slow.
Read on and learn what has caused Wi-Fi issues on your iPhone and what needs to be done when you come across the same problem.

 Part 1: Why Won't Your iPhone Connect to Wi-Fi
There are many different things that can cause Wi-Fi connectivity problems on the iPhone. Here are some common reasons for them:
1. Your iPhone Keeps Dropping Wi-Fi after An iOS Update
This problem has happened to many users from prior updates and continues to plague more users at present. This Wi-Fi issues can be caused by an improper software installation, an iOS Wi-Fi bug, temporary outage, firmware issues on the wireless router/modem, or corrupted Wi-Fi network. In worst circumstances, frequent Wi-Fi drops can be attributed to hardware damage like a defective router/modem in use, damaged Wi-Fi component on the iPhone.
2. Accidental Changes in Settings Can Also Affect iPhone’s Wi-Fi Settings
Usually, you will experience this iPhone Wi-Fi not working problem when your Wi-Fi button in “Settings” is gray in color as shown in the screenshot above. In short, it will be inactive. To be stuck in such a situation is very frustrating especially when you don't even have cellular data and want to immediately access Wi-Fi.
3. Airplane Mode Is Turned on by Mistake
Airplane mode blocks all the network connectivity on a device. If the Airplane mode is turned on, your iPhone won’t connect to the network.
4. There Might Be An Issue with Your Wireless Router
Check to make sure your router is working. Are there signs of life? Are LED lights blinking? Check your router's manual to make sure that the router is giving you signs that it is online and sending out a Wi-Fi signal.
5. Hardware Issue
You may be experiencing hardware or compatibility issues with your router so your iPhone keeps disconnecting from it. For example, the Wi-Fi antenna on your iPhone might be broken.
Part 2: How to Fix iPhone Not Connecting to Wi-Fi
After learning why your iPhone can not connect Wi-Fi correctly, now move to the part two to see how to troubleshoot an iPhone Wi-Fi not working issue.
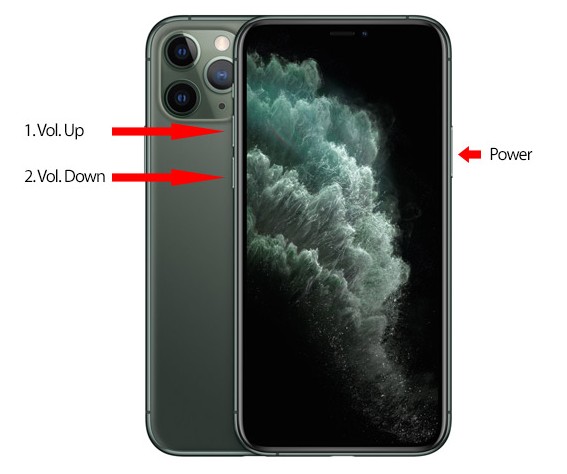
1. Restart Your iPhone to Fix iPhone Wi-Fi Dropping out
A restart can be a very effective solution if your iPhone can not connect to a Wi-Fi network or if you established the connection but it is slow or keeps dropping. You can follow the step below to restart your device and see if this helps.
Press and release the volume-up button in succession, then the volume-down button as you keep hold of the side button until the Apple logo appears.
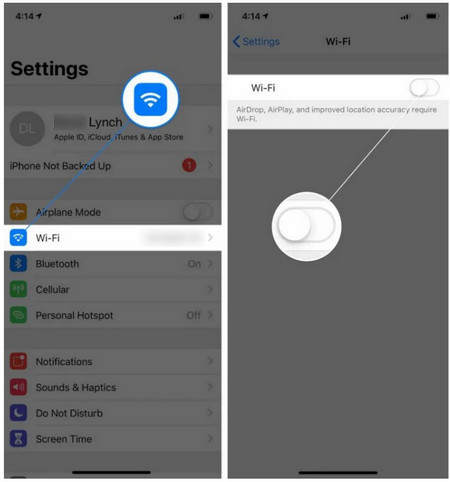
2. Turn Wi-Fi Off And Back On to Fix iPhone Wi-Fi Greyed-out issue
The exact cause of the iPhone Wi-Fi switch being greyed out is not fully known but is well-documented. Please try to turn Wi-Fi off and back on. This helps refresh your phone’s Wi-Fi functions and likewise eliminates minor flaws from the recent iOS installation.
Simply go to Settings > Wi-Fi and tap on the switch at the top of the screen to turn off Wi-Fi. Wait for a couple of seconds and tap the switch again to turn Wi-Fi back on.
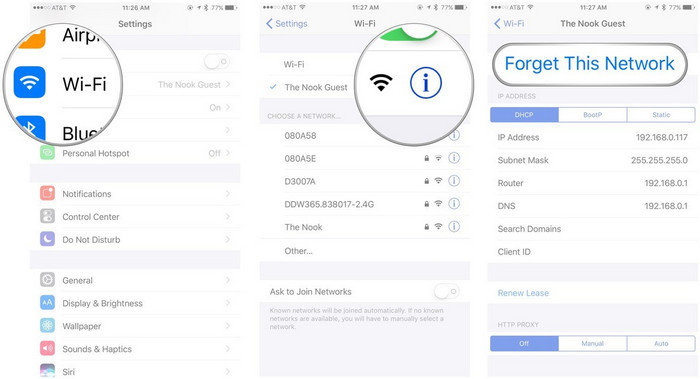
3. Forget Wi-Fi Network and Rejoin
If you’re not able to connect to a Wi-Fi Network and being prompted that the password you’ve entered is incorrect despite entering the correct password, then try to forget the Wi-Fi network, and join the network again.
- Open the "Settings" app and select Wi-Fi.
- Tap the info button (looks like an i) to the right of the network you wish to forget.
- Tap Forget This Network at the top of the screen.
- Now, again under your Wi-Fi settings, tap the network that you want, then input the password again and rejoin it.
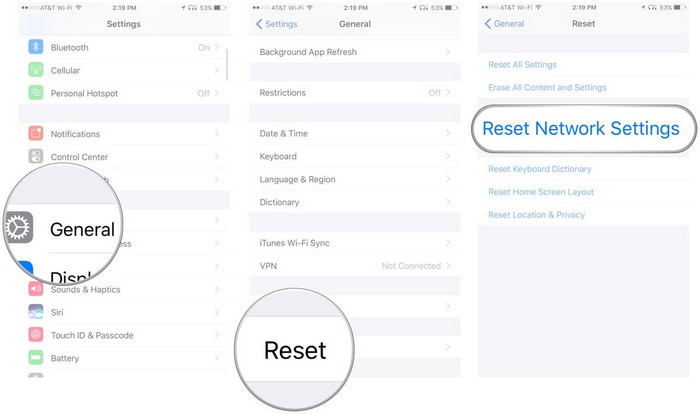
4. Reset Network Settings
Sometimes your iPhone network issues can be solved by resetting your iPhone network settings.
In the Settings app, go to "General," then scroll down to "Reset." Under that tab, tap "Reset Network Settings" and then enter your iPhone's passcode to confirm the reset. Your phone will restart, but you won't lose any data or apps.
5. Toggle Wi-Fi Assist
Wi-Fi Assist is a feature that makes your iOS device switch to mobile data in times of poor Wi-Fi connections. If you have installed iOS 9 or later, then you are probably familiar with this feature. Turning it off and turning it back on seemed to help resolve the Wi-Fi problems.
Just navigate to Settings > Cellular, scroll down to the bottom where you will see the "Wi-Fi Assist" option and then turn the feature on and turn it back off.

6. Disable VPN Connection
Sometimes, the VPN also disrupts Wi-Fi connectivity to an extent. Whether you are using a VPN through the built-in feature or via an app, try disabling it.
You can disable VPN via the Settings app and navigate to the VPN settings to disable the Status and then toggle from Connected to Not Connected. If you are not able to disable it then launch the VPN app to disable VPN temporarily to figure out if it resolves the Wi-Fi problem on your iPhone.
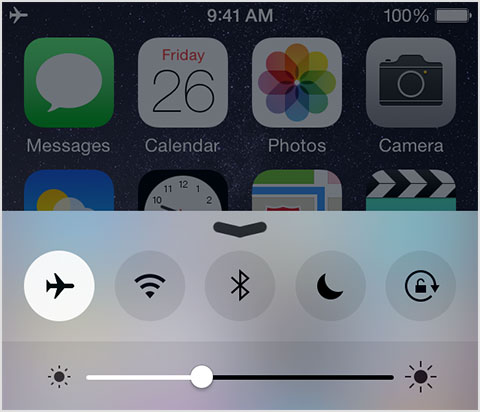
7. Toggle Airplane mode
Turning off the Airplane mode can be pretty effective and it can help you fix the problem. To fix the disrupted Wi-Fi connectivity issue due to Airplane Mode, follow these steps below.
- Bring up the Control Center by swiping up from the bottom of the screen and check if Airplane mode in your iPhone is on or off, make sure to turn it off if it is not already.
- Restart your iPhone to make sure the settings come to effect.
- Tap Forget This Network at the top of the screen.
- Now, try to get your iPhone connected to Wi-Fi again.
8. Restart Router
If your iPhone can’t connect to Wi-Fi at home but successfully connects to other networks, you may be experiencing issues with your router so you can not use your iPhone on its Wi-Fi network. Simply restart your router and try connecting your iPhone again to see if the issue can get resolved.
To restart your router, simply unplug it from the wall, wait for about 30 seconds and then plug them back in. Wait for a minute and try to connect to Wi-Fi.
9. Update Router Firmware
Sometimes a reboot just isn't enough. Just like on your iPhone and your computer, Wi-Fi routers can also suffer from software flaws, the software built into your wireless router can crash. Update your router’s firmware to ensure that the known bugs have been fixed.
Find the model and version number of your router, then go to the manufacturer’s official website, and look for the Download section. After that, download and install the firmware.
10. Restore iPhone to Factory Setting
Most users were able to fix Wi-Fi issues using one of the solutions listed above. But, if none of these tips resolve your problem, maybe you can try to restore your iPhone to factory settings. In this way, everything you have stored on your device will be erased. Be sure to back up all your important data before you factory reset your iPhone.
To get your iPhone 11 back to factory defaults easier, you can give PanFone iOS Eraser a try. It can help you to completely wipe your iPhone and guarantee you absolute privacy with a 0% recovery possibility.
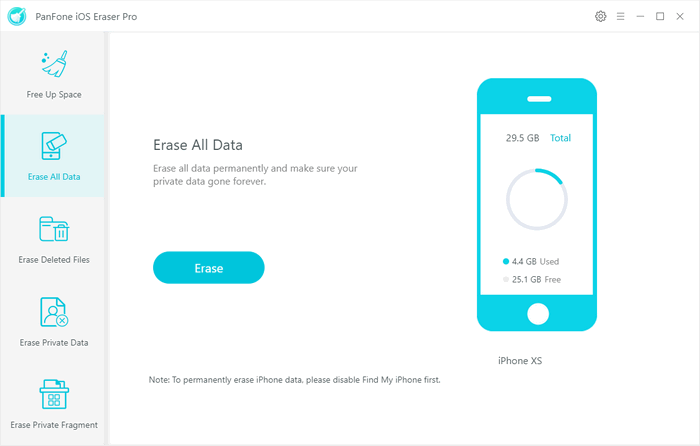
Step 1 : Launch PanFone iOS Eraser and get your iPhone connected to your computer. And remember to turn off Find My iPhone first if you want to permanently erase your iPhone data.
Download
Win Version
Buy Now
Win Version
Step 2 : Choose Erase All Data on the main interface and click on the Erase button.
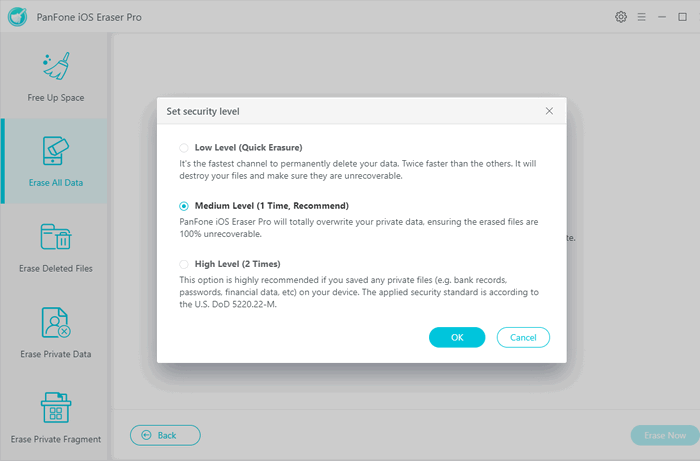
Before erasing data, you can select one from three erasing levels: Low Level, Medium Level, and High Level. The default recommended level is Medium.
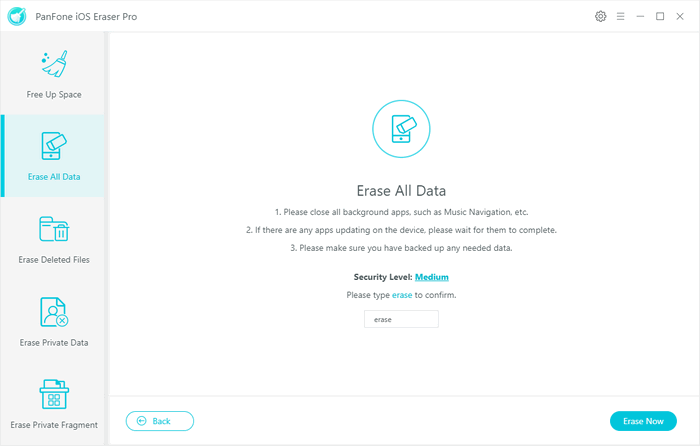
Step 3 : Type in Erase for verification, and then hit the Erase Now button to reset the iPhone.
11. Ask for Help from Repair Store
In case you have tried every possible way to fix the iPhone not connecting to Wi-Fi issue and your iPhone still shows no signs, possibly it is a hardware problem. Your iPhone, Wi-Fi chip or antenna may have a hardware issue. You will have to go to the restore to replace or repair your router or iPhone.
As you can see, this article has covered solutions in different situations. The aforementioned tips can do you a great favor to solve the issue when the iPhone won’t connect to Wi-Fi. Hopefully one of the solutions worked for you. Do not hesitate to try these solutions and share them with your friends, family or co-workers.
Download
Win Version
Buy Now
Win Version